


5 Minute Piano Warm Up That Prepares Pianists at Any Level

Roll your shoulders, circle your wrists, walk a chromatic scale from C, then play a two-octave C major scale hands together at half speed, finishing with a short broken arpeggio. That sequence takes five minutes, suits anyone from a first-year beginner to a diploma student, and this article breaks down why each step matters, how to extend it, and where players usually go wrong.
TL;DR:
A five-minute warm-up routine starting with shoulder and neck stretches, followed by wrist circles and finger stretches, effectively prepares the body for practice.
Beginning scales in C major and gradually adding G and D in multiple keys improves finger independence and control at a slow, even tempo.
Avoid before-scale drills and heavy technical exercises; instead, incorporate light, musical studies and targeted finger drills once warm.
Proper posture, relaxed breathing, and micro-breaks are essential to prevent tension buildup and ensure safe hand and wrist health.
Regular, short daily warm-ups tailored to skill level and evolving weaknesses outperform less frequent, longer sessions in developing consistent technique.
Table of Contents
Piano warm up exercises: a step-by-step 5-minute routine
Five minutes is enough to prepare your body and your ears for real practice, provided you use them in the right order. Cold fingers on a keyboard is how tension creeps into a session before you have even opened your music.
Here is the routine, minute by minute:
Minute 1: shoulder rolls and neck release. Roll your shoulders backwards and forwards several times, then gently tilt your head side to side. This releases the tension that builds up in the neck and upper back during a day at a desk or a screen.
Minute 2: wrist circles and finger stretches. Circle each wrist several times in both directions, then spread your fingers wide and hold briefly, repeating the stretch several times per hand.
Minute 3: forearm stretches and finger isolation. Extend one arm, gently pull the fingers back with the other hand to stretch the forearm flexors, then tap each finger against the thumb in turn to promote finger independence.
Minute 4: a slow chromatic walk. Play a chromatic scale ascending and descending across an octave or two, hands separate, at a tempo slow enough that every note sounds even.
Minute 5: a two-octave scale and short arpeggio. Juilliard’s basic warm-up guide recommends starting with a two-octave C major scale, hands separate then together, and this final minute is where that happens, followed by a short broken arpeggio in the same key.
If you only have two minutes, keep the physical release and the chromatic walk and skip the arpeggio. If you have ten, repeat minutes four and five in G and D major. The order matters: large muscles first, then wrists, then fine finger movement, mirrors how the body actually wakes up, and skipping straight to fast fingerwork before the shoulders and forearms have loosened is exactly how strain builds.
Which scales and arpeggios belong in your warm-up?
Start with a two-octave C major scale, then move to G and D major, the three keys most teachers use to open a session because their fingerings are the most intuitive to internalise. Play hands separate first, then hands together, and once that feels even, add contrary motion (both hands moving outward from a shared starting note) to build genuine hand independence rather than one hand quietly following the other.
Tempo strategy matters more than most players realise:
Begin at half speed and listen for evenness between fingers, not for how fast you can go.
Increase tempo only once every note sounds identical in weight and length.
Use a metronome and practise in subdivisions (quavers, then triplets) rather than jumping straight to full speed.
Play arpeggios broken and then blocked to check your hand shape is consistent in both directions.
Uneven fingers usually show up as a slight accent or drag on the fourth finger, the weakest of the five. A quick diagnostic: play the scale at half speed and listen specifically for that finger dropping in volume or lagging half a beat behind the others.
Pro Tip: Play your opening scale with your eyes closed once. You’ll hear unevenness that your eyes were compensating for.
Hanon, Czerny and technical drills: when to use them safely
Hanon and Czerny were written as technical-building exercises, not warm-ups, and treating them as the first thing your fingers do each day is a common source of strain. Charles-Louis Hanon designed his exercises for repetitive strength and evenness training, which means they load the same finger patterns over and over, and cold muscles handling that kind of repetition are more likely to tighten up than warm ones.
Use them after the five-minute physical and scale routine above, never before it, and in short doses rather than twenty minutes at a stretch. A few practical guidelines:
For finger independence, choose short Hanon-style patterns lasting no more than two or three minutes.
For evenness across the hand, Czerny’s studies tend to work better because they sit inside a musical phrase rather than a pure mechanical pattern.
For speed, only attempt drills once the two-octave scale in minute five feels completely relaxed.
Consider swapping repetitive drills for a short, musical etude passage, which builds the same technical stimulus with far less repetitive strain.
The finger independence guidance that many teachers use follows the same logic: target the weak finger specifically, briefly, and only once you’re already warm.
Stretches and posture that keep your hands and wrists safe
Shoulder rolls, neck release, wrist circles, and forearm flexion and extension aren’t optional extras. They’re what separates a warm-up from simply playing scales cold. The Trinity College teacher resource on effective warm-ups recommends exactly this combination, stretching hands, shaking out the wrists, and moving the shoulders, before any scale or arpeggio work begins.
Posture matters just as much as the stretches themselves:
Set your bench height so your forearms sit at roughly a 90 degree angle to the keys, neither reaching up nor pressing down.
Sit far enough back that your elbows have room to move freely without brushing your sides.
Check your shoulders every few minutes during practice. If they’ve crept up towards your ears, that’s tension building silently.
Keep your wrists level with the keys, not collapsed below them or arched sharply above.
Pro Tip: Pause mid-scale and shake your hands out for two seconds. If that feels like relief, you were holding more tension than you realised.
How mental practice sharpens your warm-up
Mental practice means rehearsing music in your head, imagining the sound, the fingering, and the physical movement, without touching the keys. It sounds almost too simple to matter, but research on piano performance found mental rehearsal reliably improves movement timing, anticipation, and coordination, particularly when it’s combined with physical practice rather than used alone.
Three exercises worth trying inside your warm-up:
Auditory imagery: hear the scale or passage in your head before you play it, noting exactly how each note should sound.
Silent run-through: mime the fingering of a tricky passage on a closed lid or a tabletop, focusing purely on the movement pattern.
Finger visualisation: picture each finger lifting and dropping in sequence, without any physical movement at all.
Alternating a minute of mental rehearsal with a minute of physical playing is a genuinely efficient way to reinforce a passage while giving your hands a break, which also makes it a useful tool during travel or recovery from strain.
Rhythmic and articulation drills to build coordination
Playing the same scale the same way every day trains your fingers to move, but it does little to train them to adapt. Rhythmic variation forces a different kind of coordination, and it’s one of the fastest ways to expose unevenness that a straight scale hides.
Try these inside your existing scale and arpeggio work:
Dotted rhythms (long-short, long-short) across a two-octave scale, then reverse to short-long.
Swing feel, shifting the weight of each pair of notes, useful preparation for jazz repertoire as well as coordination generally.
Staccato ascending, legato descending, then swap, to isolate articulation control in each hand.
Extreme tempo contrasts, half speed then double speed, back to half speed, using a metronome with subdivided clicks so timing stays honest rather than approximate.
These small variations translate directly into repertoire, where rhythm rarely stays as tidy as a straight scale.
Structuring your warm-up around session length
A five-minute routine before a quick practice session is not the same job as a warm-up before a two-hour rehearsal or a performance. Matching the warm-up to the goal saves time and avoids either under-preparing or over-practising before the real work even starts.
Session length | Emphasis | What to include |
5 minutes | Immediate readiness | Stretches, chromatic walk, one scale, short arpeggio |
Short doses | Technique building | Full 5-minute routine plus scales in 3 to 4 keys, contrary motion, one short drill |
Extended sessions | Rehearsal or performance prep | Full routine, scales across several keys, technical drills, mental run-through of repertoire, micro-breaks every Short doses |
For performance warm-ups specifically, weight the routine towards mental rehearsal and light physical movement rather than heavy technical drills, since the goal is readiness, not muscle fatigue. A practical daily practice routine that builds in these micro-breaks tends to produce steadier long-term progress than marathon sessions with no pauses at all.
Common warm-up mistakes worth fixing today
Jumping straight into fast Hanon patterns before your hands are warm is the single most common mistake, and it’s precisely how tension turns into genuine strain over weeks of repetition.
Skipping the physical stretches entirely because “there’s no time” for them.
Playing scales at performance tempo from the first note instead of building up from half speed.
Ignoring a dragging or accented finger instead of isolating it for thirty seconds.
Practising through pain or a burning sensation in the forearm rather than stopping.
If tension doesn’t ease after a short rest, or pain persists beyond a session, that’s a signal to stop and get advice from a teacher or, if it continues, a medical professional, rather than pushing through.
Dan’s approach to warm-ups in lessons
Every student who walks into a lesson gets a warm-up tailored to what their hands actually need that week, not a fixed routine copied from a textbook. For ABRSM and Trinity exam candidates, that often means isolating whichever scale or arpeggio pattern the syllabus demands and drilling it briefly before moving to repertoire. For younger beginners, the same five-minute structure gets simplified to shoulder rolls, a five-note pattern, and a single octave scale, keeping the sequence but shrinking the scale of it. Formal grounding in piano pedagogy and years of teaching across Central London studios shape this, alongside consistent feedback from students who’ve moved from stiff, hesitant playing to genuinely relaxed technique once warm-ups became routine rather than optional.
Building finger independence beyond scales and arpeggios
Scales train fingers to move in sequence, but they don’t isolate a single weak finger the way a targeted drill can. Finger independence exercises fill that gap, and they’re worth five minutes on their own once or twice a week.
A useful diagnostic drill: play a two-octave C major scale at half speed and listen for which finger consistently drags or drops in volume, almost always the fourth. Once you’ve identified it, hold down two adjacent fingers on the keys and lift and drop the target finger repeatedly for thirty to sixty seconds, isolating its movement without the others compensating. This kind of targeted finger drill works precisely because it removes the crutch of stronger fingers doing the work.
Other useful exercises include five-finger patterns played with varying finger combinations (1-3-2-4-5 instead of the standard 1-2-3-4-5), and simple trills between two fingers held at a slow, even tempo before gradually increasing speed. Playing one hand legato while the other plays staccato, then swapping, builds a genuinely different kind of independence: coordination between the hands rather than within one.
None of these need to be lengthy. Two or three minutes of targeted work, done consistently, produces more noticeable change than an occasional twenty-minute session focused entirely on strength.
Breathing and posture: the part most players skip
Pianists rarely think about breathing, yet held breath is one of the most common hidden sources of tension at the keyboard. Watch a nervous student play a tricky passage and you’ll often see their shoulders rise and their breathing shorten without them noticing.
Before you play a single note, take three slow breaths, in through the nose for a count of four, out for a count of six. That longer exhale activates a calming response and gives your shoulders permission to drop rather than creep upward. Check in with your breathing again every few minutes during a longer session, particularly through any passage that feels physically demanding.
Posture and breathing work together. Sit tall without rigidity, letting your spine support your upper body rather than your shoulders doing that job. Your feet should rest flat on the floor or a footstool if you’re a younger student, giving your whole body a stable base rather than floating tension up through your legs and into your playing. If you notice your jaw clenching or your shoulders lifting mid-phrase, that’s usually a breathing cue: pause, exhale fully, and reset before continuing. This small habit, checked consistently, prevents the slow accumulation of tension that turns into genuine discomfort after months of practice.
How to progress your warm-up over months, not days
A warm-up that never changes eventually stops doing its job, because your technical weaknesses shift as your playing develops. What challenges a beginner’s fingers in month one is trivial by month six, and a routine that doesn’t grow with you wastes time on problems you’ve already solved.
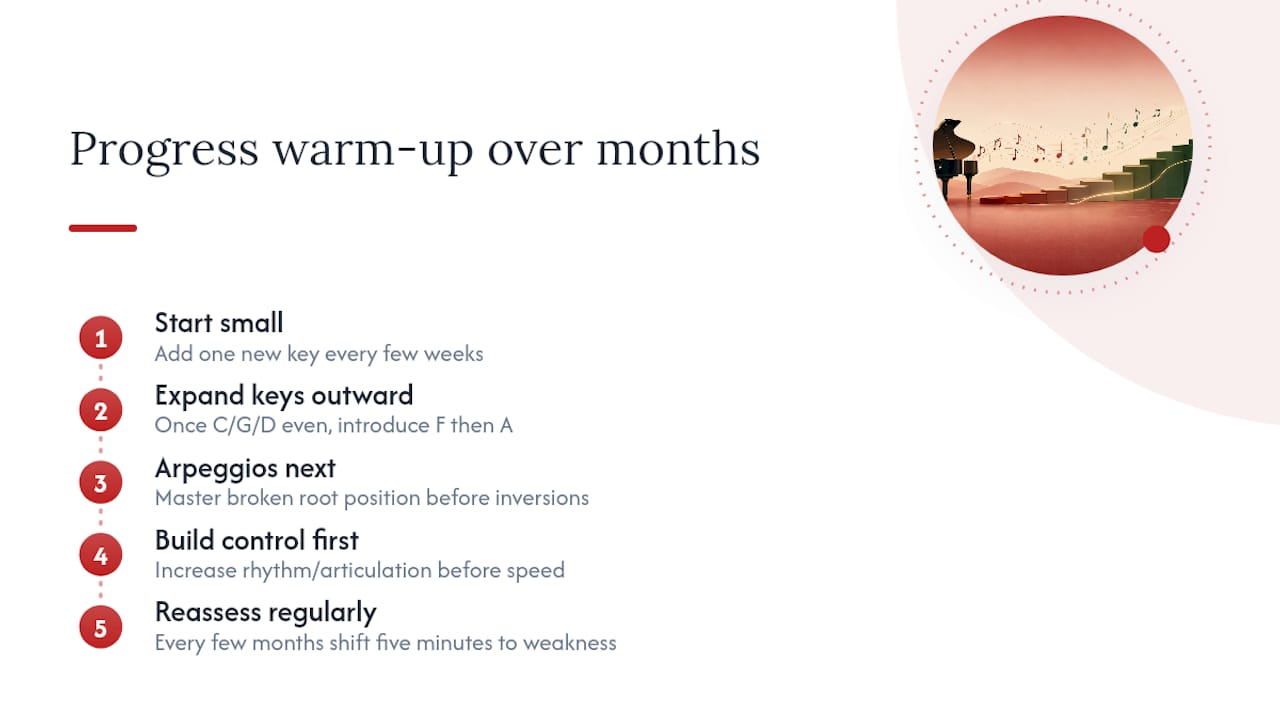
Start by adding one new key every few weeks rather than jumping straight into all twelve major scales. Once C, G, and D feel genuinely even at a brisk tempo, introduce F major, then A major, building outward gradually rather than all at once. The same logic applies to arpeggios: master the broken arpeggio in root position before adding first and second inversions.
Increase complexity through rhythm and articulation before you increase raw speed. A scale that’s rock solid at a moderate tempo with staccato, legato, and dotted rhythm variations is a better foundation than the same scale played fast but sloppily. Once that’s genuinely secure, gradual speed increases stick far better because they’re building on control rather than masking its absence.
Reassess every few months. Play through your warm-up and notice which section now feels automatic and which still needs conscious attention, then shift your five extra minutes towards whatever’s currently weakest. This keeps the routine efficient rather than bloated with drills you’ve already mastered.
Adapting your warm-up to your actual skill level
A beginner and an advanced player warming up identically wastes time for one of them, usually both. The five-minute structure holds at every level, but what fills each minute should change.
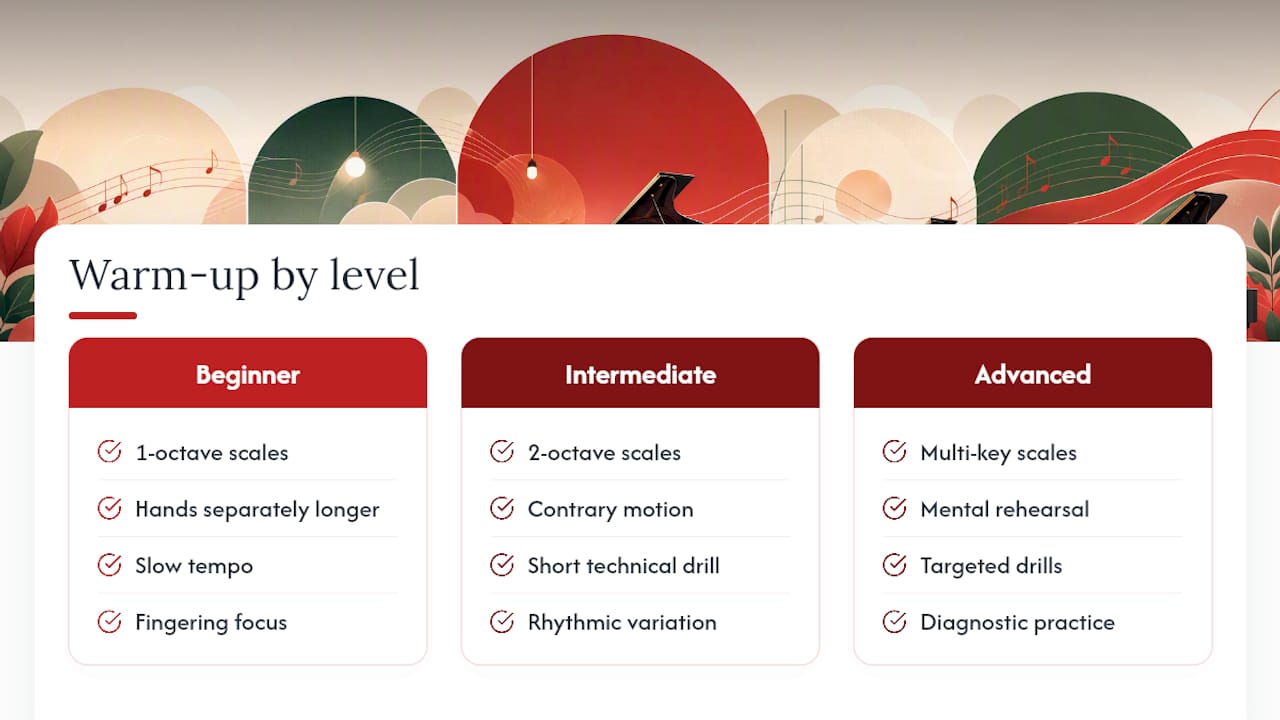
Beginners benefit from shorter scales, often a single octave rather than two, played hands separately for longer before attempting hands together. Keep tempo genuinely slow and prioritise finding the correct fingering over speed of any kind, since bad habits formed early are far harder to undo later than they are to prevent now.
Intermediate players can handle the full two-octave scale routine described earlier, adding contrary motion and a short technical drill once warm. This is also the stage where rhythmic variation becomes genuinely useful, since coordination between the hands is developed enough to handle dotted rhythms and swing feel without falling apart.
Advanced players and exam candidates should extend the routine to cover scales and arpeggios across several keys, incorporate mental rehearsal of upcoming repertoire, and use technical drills more deliberately, targeting specific passages in current pieces rather than generic patterns. At this level, the warm-up often blends into diagnostic practice: identifying exactly which passage in a Chopin étude needs isolated attention today, and building that into the five or ten minutes before full rehearsal begins.
Consistency matters more than duration
Five focused minutes, done every single day, will do more for your technique than an hour-long warm-up you only manage twice a week. That’s the honest lesson from years of watching students improve, or stall.
The routine outlined in this article is a starting point, not a script to follow forever. A student struggling with a weak fourth finger needs different emphasis than one whose shoulders tense the moment they sit down. Adapt the minutes to your own weaknesses rather than copying the sequence exactly, and revisit which parts need more attention every few weeks.
One student who felt permanently stiff at the keyboard started doing just the first two minutes, shoulder rolls and wrist circles, before every practice session. Within a month, the tension that used to build by the second page of a piece had noticeably eased. Small, consistent habits beat occasional big efforts almost every time.
— Dan
How Dan Piano Studio helps you put this into practice
Reading about warm-ups is one thing. Having someone watch your hands and catch the exact habit that’s holding you back is another entirely. Danpianostudio offers a genuine alternative to working it out alone: a teacher who spots the tension in your shoulders or the drag on your fourth finger before it becomes a real problem, whether that’s in person or over a screen.
A first lesson at the studio typically starts as a short diagnostic session, working through scales, posture, and a few technical patterns to see exactly where your warm-up should focus. From there, lessons are shaped around what actually needs work rather than a generic checklist. If you’re based in Central London, Camden, or King’s Cross, home piano lessons bring that same tailored approach to your own instrument, and online piano lessons offer the same feedback wherever you’re based. Booking a first session is the simplest way to find out what your own warm-up is missing.
Sources
For readers who want to dig deeper into the research and resources behind this routine:
Recommended


Comments