


Blues scale piano: play the C blues right now


The C minor blues scale runs C – E♭ – F – G♭ – G – B♭ – C, with the G♭ in the middle as the note that gives the blues its ache. Play those seven notes in order and you have already played something genuinely musical.
Right-hand fingering (one octave, C to C):
C(1) – E♭(2) – F(3) – G♭(4) – G(1, thumb under) – B♭(2) – C(3)
Left-hand fingering (one octave, C to C):
C(5) – E♭(4) – F(3) – G♭(2) – G(1) – B♭(3, cross over) – C(2)
To extend across two octaves, simply repeat the right-hand pattern from the new C, keeping the same finger groupings. The blues scale is a six-note (hexatonic) scale built from the minor pentatonic with one extra note added: the flattened fifth (♭5), also written as the augmented fourth (♯4). That single added note, G♭ in the key of C, is the blue note, the source of all the tension and colour that makes this scale instantly recognisable.
Key takeaways
The C minor blues scale (C – E♭ – F – G♭ – G – B♭ – C) is the single most practical scale for developing blues improvisation on piano, and the four-week plan above gives a structured path from first notes to playing over a full 12-bar progression.
Point | Details |
The C minor blues scale | Play C – E♭ – F – G♭ – G – B♭ – C; right-hand fingering is 1–2–3–4–1–2–3. |
Minor vs major blues scale | Use the minor form for darker, plaintive phrases; switch to the major form (C – D – E♭ – E – G – A) for a brighter colour over the I chord. |
The blue note | G♭ (♭5/♯4 in C) is the defining note; resolve it to G for tension-release, the core of blues phrasing. |
12-bar application | The C minor blues scale works across all three chords (C7, F7, G7); practise it over the full progression, not just the I chord. |
Danpianostudio lessons | One-to-one lessons in Central London and online provide personalised feedback on blues fingering, phrasing, and improvisation. |
Table of Contents
What is the blues scale and how does it relate to the pentatonic?
The blues scale exists in two main forms: the hexatonic (six-note) version, which is by far the most common, and various heptatonic (seven-note) variants that add extra chromatic passing tones for additional colour. When a teacher, textbook, or YouTube tutorial says “the blues scale,” they almost always mean the hexatonic minor form.
The blue note: ♭5 or ♯4?
Both names describe the same pitch. In the key of C, that note is G♭ (or enharmonically F♯). Theorists writing in a minor context call it the ♭5 because it sits a diminished fifth above the root. Those writing in a major or dominant context sometimes prefer ♯4, since it functions as a raised fourth. On the piano, the key is identical either way. The tension it creates against a dominant seventh chord, where it clashes with both the third and the fifth, is precisely what gives blues its characteristic pull.
From pentatonic to blues scale
The minor pentatonic in C is: C – E♭ – F – G – B♭. Add G♭ between the F and the G and you have the C minor blues scale. That is the only difference. The major blues scale follows the same logic from the other direction: take the major pentatonic (C – D – E – G – A) and insert E♭ between D and E. The result is C – D – E♭ – E – G – A – C, a brighter, more hopeful sound that still carries a blues inflection through that chromatic E♭.
How to play the minor blues scale across the keyboard
The formula for the minor blues scale is 1 – ♭3 – 4 – ♭5 – 5 – ♭7, which in interval terms means: minor third, whole step, semitone, semitone, minor third, whole step back to the octave. That semitone–semitone cluster around the blue note (F – G♭ – G in C) is the fingerprint of the scale.
Notes in common keys
Key | Blues scale notes |
C | C – E♭ – F – G♭ – G – B♭ – C |
A | A – C – D – E♭ – E – G – A |
G | G – B♭ – C – D♭ – D – F – G |
E | E – G – A – B♭ – B – D – E |
F | F – A♭ – B♭ – B – C – E♭ – F |
The hexatonic blues scale formula 1 – ♭3 – 4 – ♭5 – 5 – ♭7 applies identically in every key; transpose by shifting the root and following the same interval pattern.
Fingering across one and two octaves
Right hand, one octave (C blues):
C(1) – E♭(2) – F(3) – G♭(4) – G(1) – B♭(2) – C(3)
For a second octave, continue: E♭(1) – F(2) – G♭(3) – G(4) – B♭(1) – C(2)
Left hand, one octave (C blues):
C(5) – E♭(4) – F(3) – G♭(2) – G(1) – B♭(3) – C(2)
Keyboard diagram (C minor blues scale — keys to highlight): White keys: C, F, G; Black keys: E♭, G♭, B♭. The cluster of two adjacent black keys (E♭ and G♭) with a white key (F) between them is a useful visual anchor.
Hand position tips:
Keep the wrist level and relaxed; avoid collapsing the knuckle joints on the black keys.
The thumb-under move (right hand, finger 4 to finger 1 on G) needs to happen smoothly and early, not at the last moment.
Practise the scale hands separately at a slow tempo before combining them.
Good hand position and technique matters as much for blues as for classical work; a tense wrist will limit your speed and expression.
Pro Tip: Practise the F – G♭ – G semitone cluster in isolation first. Play F – G♭ – G – G♭ – F repeatedly until it feels automatic. That tiny figure appears in almost every blues lick you will ever play.
How to play the major blues scale and when to use it
The major blues scale formula is 1 – 2 – ♭3 – 3 – 5 – 6, giving in C: C – D – E♭ – E – G – A – C. The chromatic passing note here is E♭, sitting between D and E natural, and it functions as a bluesy grace note rather than a structural tone.
The sonic difference between the two forms is immediately obvious. The minor blues scale has a darker, more plaintive quality; the major blues scale sounds brighter and more optimistic while still carrying that blues inflection. Think of the minor form as the sound of a slow, late-night blues and the major form as the sound of a cheerful early rock and roll shuffle.
When to use each form
Use the minor blues scale over minor seventh chords, dominant seventh chords in a minor context, and across the whole of a minor-key 12-bar progression. It works over all three chords (I7, IV7, V7) in a standard blues without sounding wrong, which is one of the reasons beginners find it so immediately useful.
Use the major blues scale when the harmony is clearly major in character, particularly over a I chord with a major quality, or when you want a brighter ending to a phrase. Many experienced players blend both: starting a phrase with the major blues scale over the I chord, then slipping into the minor form as the harmony moves to IV or V. Yamaha’s tutor materials recommend trying both forms for contrasting colours, and that advice holds up in practice.
Blues licks and exercises to build real phrasing
Get a lick under your fingers before you worry about theory. That play-first instinct is the fastest route to sounding musical rather than mechanical.
Four essential licks in C (describe and practise these)
Lick 1 — The classic turnaround figure: G♭ – G – B♭ – C (right hand, fingers 4–1–2–3). Play it with a slight swing feel, leaning on the G♭. This is the blue note doing its job.

Lick 2 — Call and response: B♭ – G – F – E♭ (descending, fingers 2–1–4–3), then rest for two beats. The silence is part of the phrase.
Lick 3 — The hammer-on feel: Play E♭ and F together briefly, then resolve to G. On piano you simulate a guitar hammer-on by playing E♭ very lightly and immediately pressing F and G in quick succession.
Lick 4 — The bent note approach: Play G♭ and G♭ again, then resolve to G natural. The repetition of the blue note before resolution creates the characteristic blues tension-release.
Many common blues licks draw on exactly these moves: the blue note approached from below, repeated, then resolved upward or downward.
Progressive exercises
Slow scale with swing rhythm. Play the C blues scale ascending and descending at 60 bpm, swinging the eighth notes (long-short). Use a metronome. This trains the ear to hear the scale as music, not as an exercise.
Blue note isolation. Play F – G♭ – G in a loop, varying the rhythm. Then reverse: G – G♭ – F. This is the most-used three-note figure in blues piano.
Call and response. Play a four-note phrase from the scale, then rest for four beats, then answer with a different four-note phrase. Record yourself and listen back.
Lick transposition. Take Lick 1 above and move it to the key of A (D♭ – D – F – A). Transposing licks is how you build a real vocabulary rather than a collection of memorised patterns.
Hands together. Play a simple left-hand ostinato (C – G in the bass, alternating) while improvising with the right hand using only the blues scale. Keep the left hand steady; let the right hand wander.
Practising blues scales with a metronome and backing tracks develops timing and phrasing far more quickly than running scales in silence. Search for “C blues backing track” on YouTube and you will find dozens of free options at various tempos.
Using the blues scale over a 12-bar blues
The twelve-bar blues is a 12-measure repeating progression built on three chords: the I (tonic), IV (subdominant), and V (dominant). In the key of C, those chords are C7, F7, and G7. The standard layout looks like this:
Bar | 1 | 2 | 3 | 4 | 5 | 6 | 7 | — | — | 10 | — | 12 |
Chord | C7 | C7 | C7 | C7 | F7 | F7 | C7 | C7 | G7 | F7 | C7 | G7 |
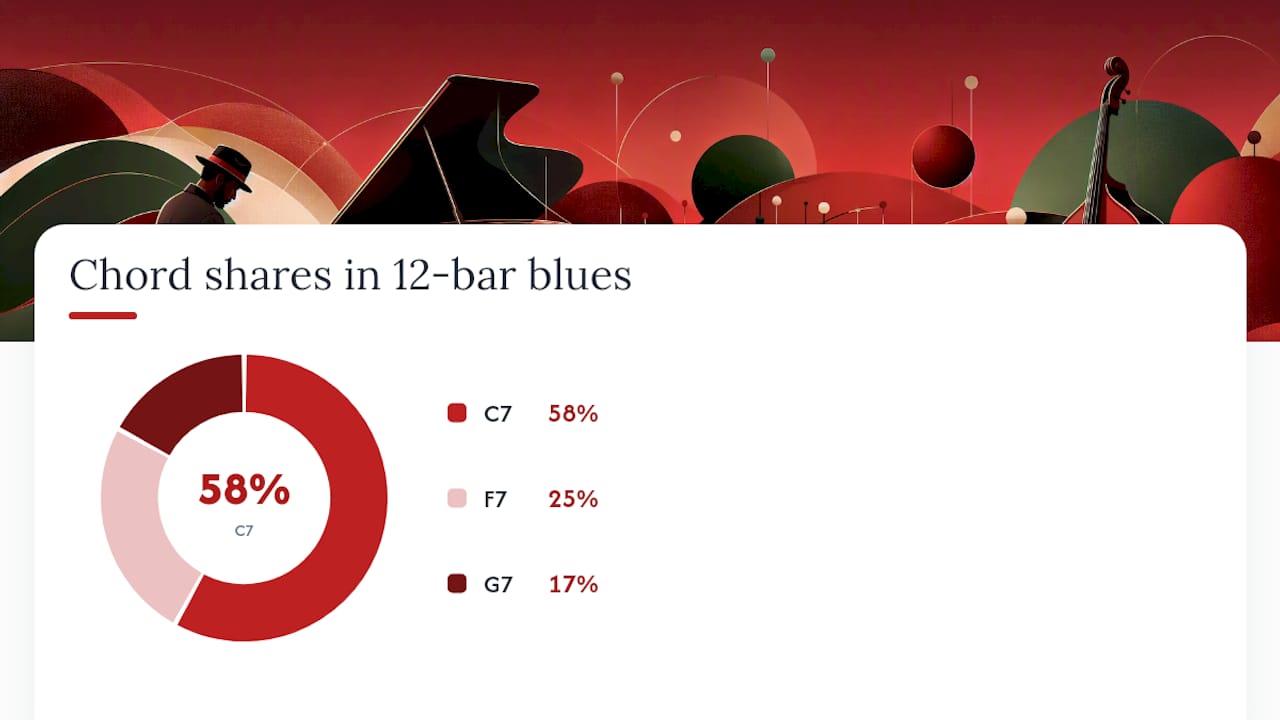
The C minor blues scale works across all twelve bars without adjustment. The blue note G♭ creates tension against the C7 chord (where the fifth is G natural) and that tension is the point. Over F7, the same G♭ functions as the ♭3 of F, which fits naturally. Over G7, it becomes the ♭7, again a comfortable fit.
Scale tones over each chord
Over C7 (I): all six notes of the C blues scale work. The G♭ creates the most tension; resolve it to G for satisfaction.
Over F7 (IV): E♭ and B♭ sit particularly well (they are the ♭7 and fifth of F7). G♭ still works as a passing note.
Over G7 (V): B♭ (the ♭3 of G) and F (the ♭7 of G7) are the strongest choices. The G♭ resolves nicely down to F.
For a brighter sound over the I chord, switch briefly to the C major blues scale (C – D – E♭ – E – G – A). Many players use the minor blues scale for bars 5–12 and the major form for bars 1–4, giving the progression a natural arc. The blues scale in C works over both C7 and Cm7 contexts, which is why it is so versatile for beginners.
Left-hand patterns
A simple boogie bass pattern for C7: alternate C and G in the bass (octave apart), then add B♭ on the offbeat. Written out: C(beat 1) – G(beat 2) – B♭(beat 2+) – G(beat 3) – C(beat 4). Keep it steady and let the right hand play freely above it.
A walking bass approach: C – E – G – B♭ (one note per beat, ascending through the chord tones of C7), then move to F – A – C – E♭ when the chord changes to F7. This connects the chords smoothly and gives the left hand a melodic role. For more on jazz piano chord voicings that work alongside blues patterns, the studio’s chord guide is a useful next step.
A step-by-step beginner approach is to learn the left-hand pattern first, get it automatic, then add right-hand blues licks on top. Trying to do both simultaneously from day one usually means neither hand does its job properly.
A four-week practice plan from Danpianostudio
This plan assumes roughly 20–30 minutes of focused practice per day. Shorter sessions done consistently beat long sessions done occasionally.
Week 1 — Learn the C minor blues scale. Play it hands separately, ascending and descending, at 60 bpm. Memorise the notes. Practise the F – G♭ – G cluster in isolation. By the end of the week, play it hands together without looking at the keys.
Week 2 — Add a left-hand pattern. Choose the boogie bass pattern above. Practise it alone until it is automatic (10 minutes), then add the right-hand scale on top (10 minutes). Spend the last 5 minutes improvising freely with just the blues scale in the right hand.
Week 3 — Learn two licks and the 12-bar structure. Memorise Lick 1 and Lick 2 from the section above. Map out the 12-bar chord sequence in C. Play the left-hand pattern through all 12 bars, inserting your licks at natural moments. Record a short clip and listen back critically.
Week 4 — Play over a backing track and introduce the major blues scale. Find a slow C blues backing track (60–70 bpm). Improvise for the full 12 bars using the minor blues scale, then try the major blues scale over bars 1–4. Aim for musical phrases with space between them, not a continuous stream of notes.
Pro Tip: Record yourself at the end of each week. You will hear things in a recording that you miss while playing. A 30-second clip is enough. Compare week 1 with week 4 and the progress will be obvious.
For broader beginner practice strategies that complement this blues plan, the studio’s teaching resources cover technique, timing, and musical development in more depth.
Quick answers to common blues scale questions
What is the most common blues scale? The hexatonic minor blues scale (1 – ♭3 – 4 – ♭5 – 5 – ♭7) is the standard starting point for virtually all blues and blues-influenced playing.
Is the blue note a ♭5 or a ♯4? Both names describe the same pitch. In C, that note is G♭/F♯. The name depends on context, not the sound.
Should I practise blues scales? Yes. They build improvisation vocabulary, ear training, and phrasing instincts faster than almost any other single exercise.
How do I start? Learn the C minor blues scale hands separately, then add a simple left-hand pattern. The four-week plan above gives a structured path.
Which fingering should I use? For the right hand in C: 1–2–3–4–1–2–3. For the left hand: 5–4–3–2–1–3–2. These are the standard one-octave fingerings; see the detailed section above for two-octave extensions.
Why the blues scale is the most important scale you will learn
Most piano students spend years on major and minor scales and never quite understand why their improvisation sounds academic. The blues scale fixes that problem almost immediately, and not because it is simple. It works because it encodes the tension-and-release logic that underlies most Western popular music: the blue note creates dissonance, and the resolution to the fifth or the root creates satisfaction. Once you hear that mechanism, you start hearing it everywhere, in jazz, in gospel, in rock, in soul.
There is a tendency in piano teaching to treat the blues scale as a beginner detour before the “real” theory begins. That framing is wrong. Professional jazz pianists use the blues scale throughout their careers precisely because it is so direct and expressive. The scale does not limit your playing; it gives you a vocabulary that connects to an audience immediately, regardless of their musical background.
The studio’s approach at Danpianostudio is to introduce the blues scale early and return to it often, layering in more harmonic complexity as technique develops. Blues is not a stepping stone. It is a destination worth staying in.
Blues lessons at Danpianostudio: in-person and online

If you want to move through this material faster and with feedback that is specific to how you play, Danpianostudio offers one-to-one piano lessons in Central London and online piano lessons for beginners through advanced players. The difference between working through a scale guide alone and having a teacher listen to your phrasing and adjust your fingering in real time is significant, particularly for blues, where feel and timing matter as much as the notes.
A first lesson at Danpianostudio includes an honest assessment of where you are, a personalised practice plan, and a clear sense of what to focus on in the weeks ahead. Lessons cover blues, jazz, improvisation, classical technique, and exam preparation for ABRSM and Trinity, tailored to your goals and schedule. Book your first lesson at Danpianostudio.
Sources
For notation, scale diagrams, and further reading:
For backing tracks: search “C blues backing track slow” on YouTube. Aim for tracks at 60–80 bpm when starting out, and increase the tempo only when your phrasing feels relaxed at the slower speed.
Recommended


Comments